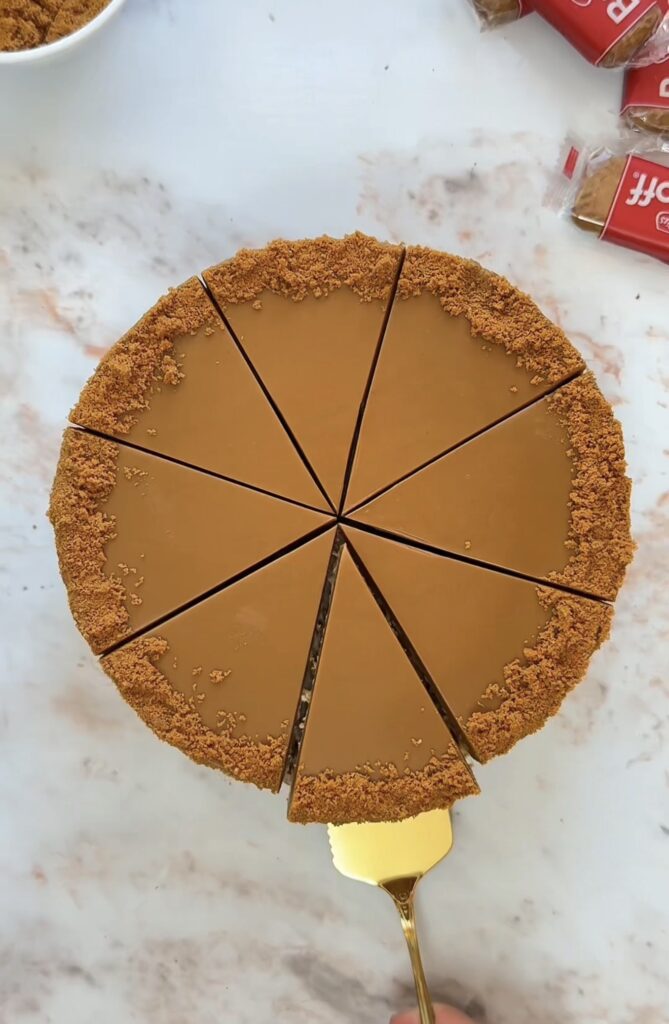
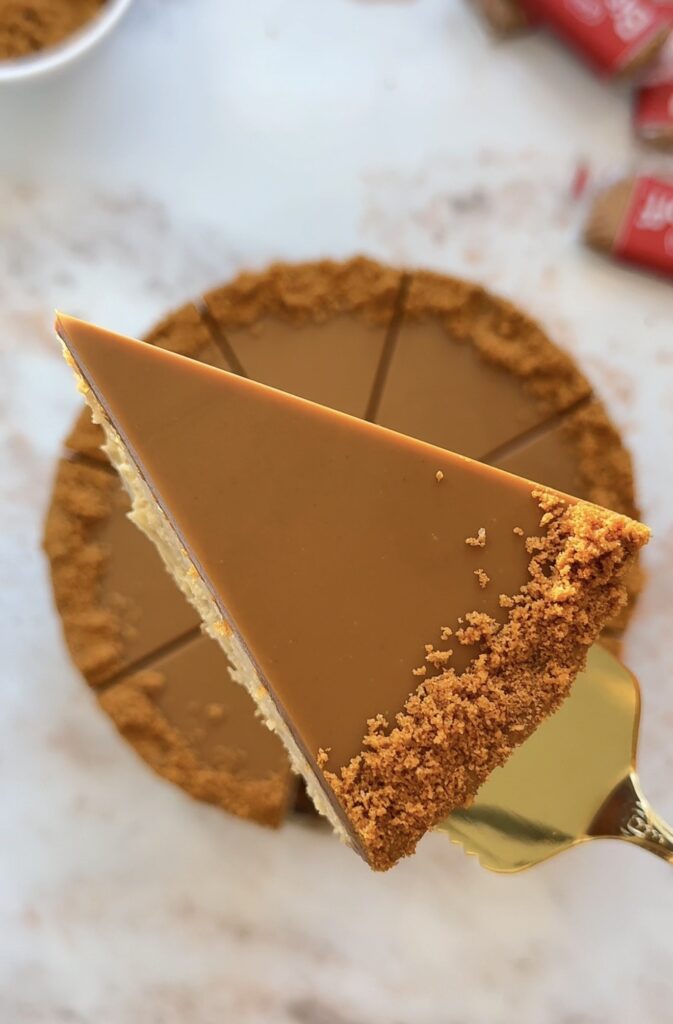
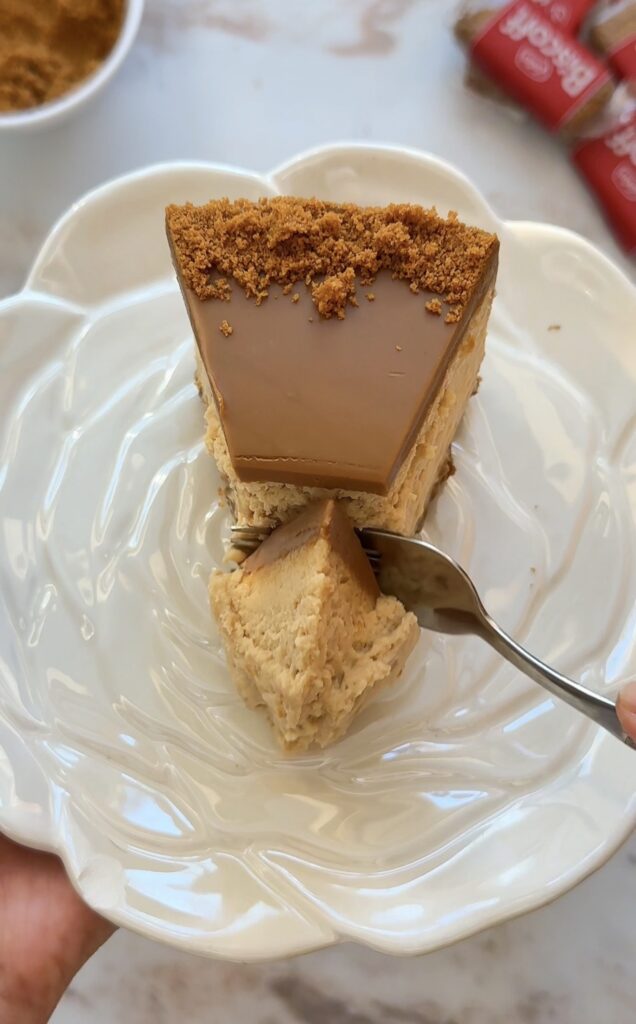
Biscoff Cheesecake
If Biscoff is your weakness, prepare to fall completely in love. This Biscoff cheesecake is everything dreamy desserts are made of. 🍪✨ Silky, rich, and packed with that warm, caramelised cookie butter flavor you can’t get enough of, it sits on a buttery biscuit base and gets crowned with a glossy pour of melted Biscoff spread and crunchy crushed Biscoff biscuits on top. It’s the kind of show-stopping dessert that looks straight out of a bakery window, but tastes even better. 💛
Whether you’re baking it for a birthday, a holiday gathering, or just because you deserve something cozy and indulgent this week, this Biscoff cheesecake delivers pure caramel-cookie heaven in every single bite. It’s creamy, melt-in-your-mouth tender, and honestly… dangerously good. ☕
What is Biscoff cheesecake?
Biscoff cheesecake is a creamy baked cheesecake made with full-fat cream cheese, melted white chocolate, and rich Biscoff (cookie butter) spread, set on a buttery biscuit base. It’s traditionally topped with more melted Biscoff and crushed Biscoff biscuits for that signature caramelised flavor and crunchy finish.
Why You’ll Love This Biscoff Cheesecake
- Deep caramelised flavor — real Biscoff spread gives it that warm, cookie butter taste in every bite ✨
- Silky, creamy texture — the water bath method keeps it perfectly smooth with zero cracks
- Show-stopping appearance — the glossy Biscoff topping and crushed biscuits make it Instagram-worthy 📸
- Make-ahead perfect — it actually tastes better the next day after chilling overnight
- Bakery-style at home — skip the café prices and make this beauty in your own kitchen
- Perfect for every occasion — birthdays, holidays, dinner parties, or just a treat-yourself moment
This cheesecake combines the classic technique of a New York-style baked cheesecake with the irresistible flavour of Lotus Biscoff — a fusion that feels both familiar and indulgent. ☕💛
The Story Behind This Recipe
There’s something so nostalgic about Biscoff. Those little caramelised biscuits served alongside coffee at cafés, the warm cinnamon spice, that distinct cookie butter flavour that turns even the simplest dessert into something special, it’s a flavour that always feels like a cozy hug.
This Biscoff cheesecake is honestly one of my proudest bakes. I love how the silky filling melts on your tongue, how the glossy Biscoff topping catches the light, and how every slice gets that perfect golden caramel finish. ✨ Cooking and baking is my therapy, and few things bring me as much joy as carefully assembling a cheesecake like this, it’s slow, mindful, and the reward at the end? Absolutely worth every single minute. ☕💛
Equipment You’ll Need
- 9-inch round springform pan
- Large mixing bowl
- Electric hand mixer or stand mixer
- Spatula Food processor or rolling pin (for crushing biscuits)
- Baking paper
- Aluminum foil (heavy-duty works best)
- Large baking pan (for the water bath)
- Kettle or pot for hot water
- Small saucepan or microwave-safe bowl (for melting)
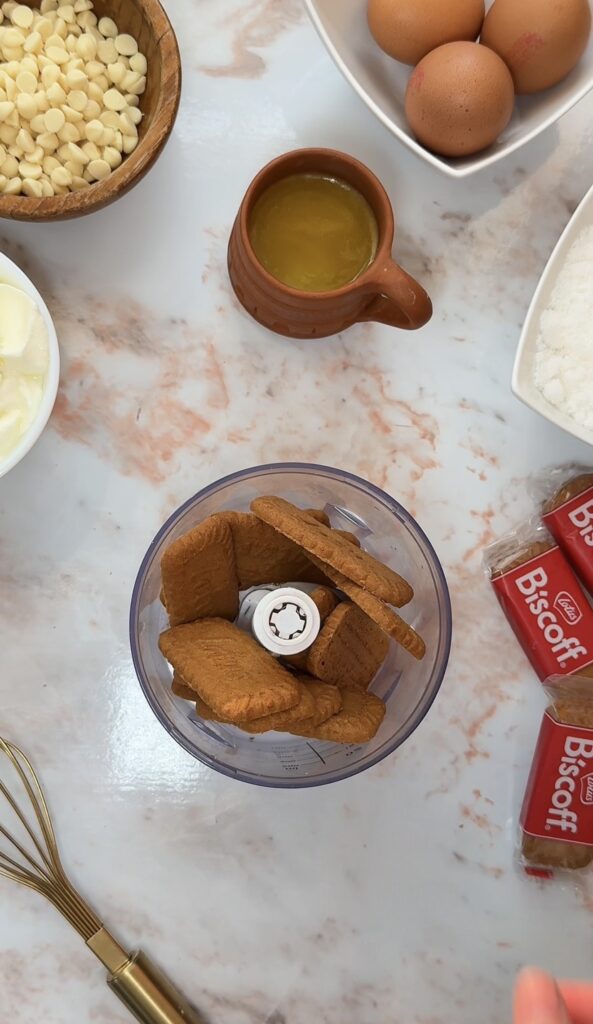
Ingredients You’ll Need
⚠️ Important: Make sure all your ingredients are at room temperature before starting. This is the #1 secret to a smooth, lump-free cheesecake!
For the Crust
- 250g biscuits, crushed — Lotus Biscoff biscuits are the dream choice here, but digestives or graham crackers also work
- 70g unsalted butter, melted — binds the crust and gives it that buttery flavour
For the Cheesecake Filling
- 600g full-fat cream cheese — must be full-fat for that perfect creamy texture (low-fat will make it watery)
- 100g sugar — just enough sweetness without overpowering the Biscoff
- 200g full-fat sour cream — adds tang and silkiness
- 100g white chocolate, melted and cooled — deepens the richness and helps it set beautifully
- 200g Biscoff spread — the star of the show! Use Lotus Biscoff for the most authentic flavor
- 3 large eggs — bind the filling without making it dense
- 15g cornstarch (cornflour) — keeps the cheesecake stable and prevents cracking
- ¼ tsp salt — balances the sweetness and enhances the Biscoff flavor
- 1 tsp vanilla extract — adds warmth and depth
- 5 tbsp condensed milk — adds extra creaminess and a gentle caramel sweetness
For the Topping
- 200g Biscoff spread, melted until pourable — for that glossy, dreamy finish
- Crushed Biscoff biscuits — adds beautiful texture and visual appeal
How To Make Biscoff Cheesecake
Make the Crust
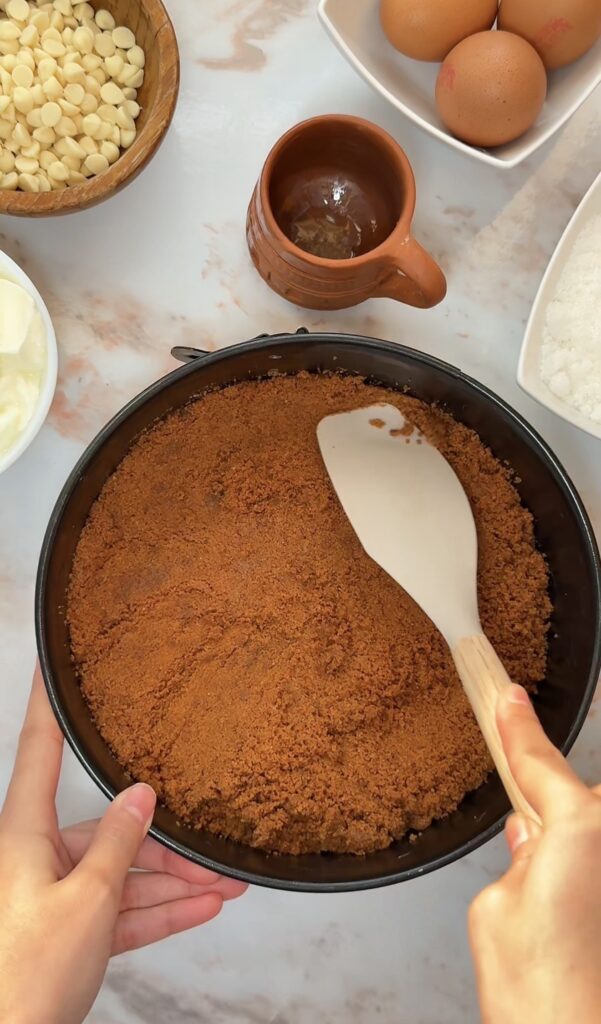
1. Preheat your oven to 180°C (350°F). Grease a 9-inch round springform pan with butter, then flip the base of the pan upside down — this little trick makes releasing the cheesecake so much easier later! Line the bottom with baking paper.
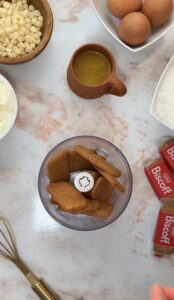
2. Finely crush the biscuits in a food processor (or place them in a sealed bag and crush with a rolling pin). Transfer to a bowl and add the melted butter, mixing until evenly moistened — it should look like wet sand.
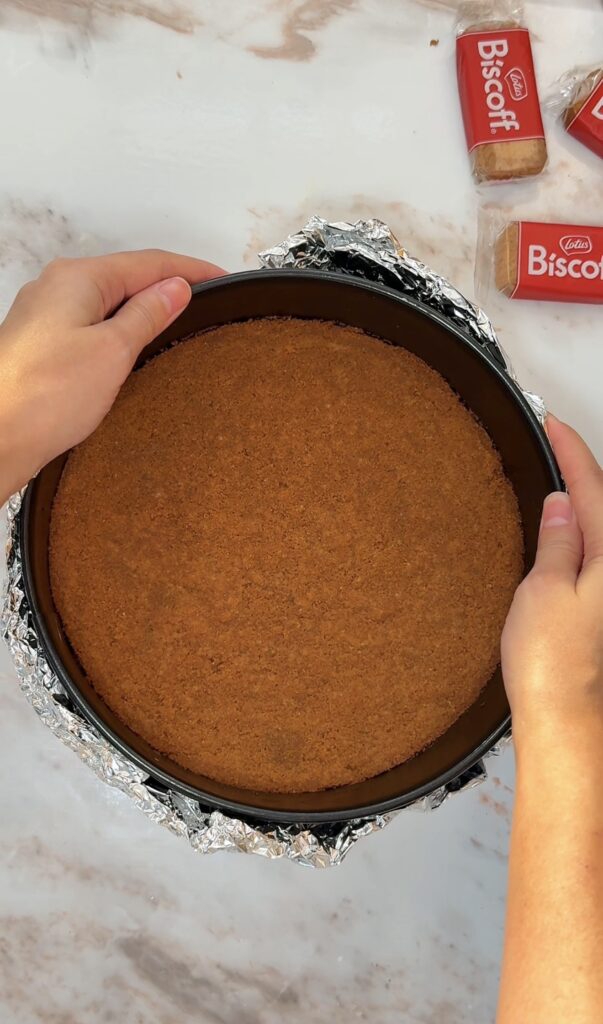
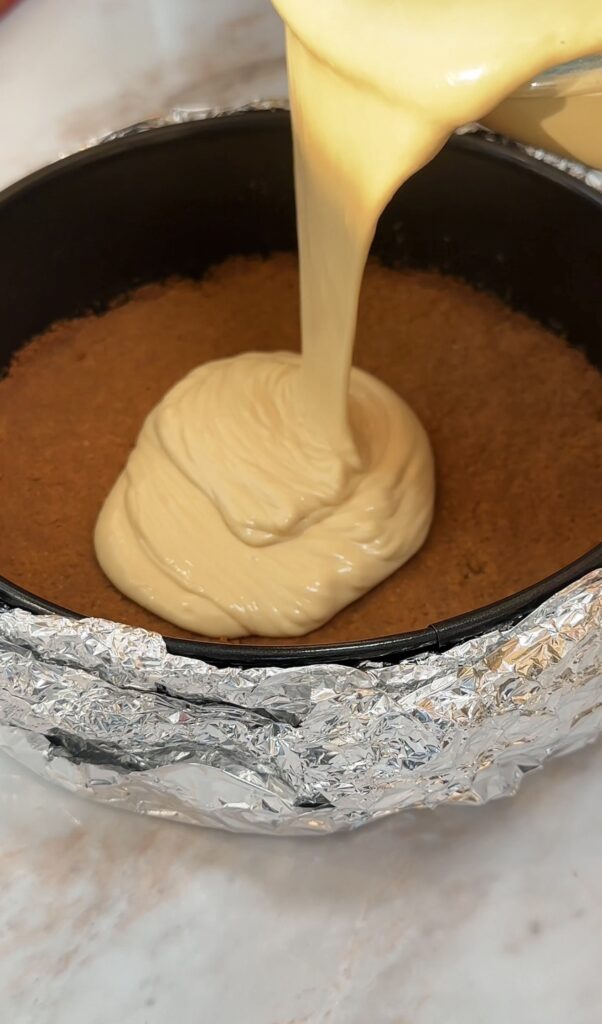
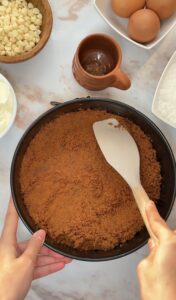
3. Transfer the mixture into the prepared pan. Spread it into an even layer and press it down firmly using the base of a cup — this gives you a perfectly even, compact crust. Bake for 10 minutes, then remove from the oven and let cool completely.
Make the Cheesecake Filling
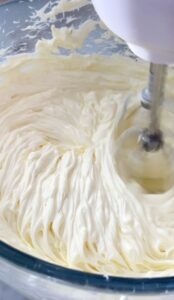
4. Add the room-temperature cream cheese to a large mixing bowl and beat for 3 minutes until completely smooth and creamy. This step is essential — don’t rush it!
5. Add the sugar and beat for another 2 minutes until fully combined and fluffy.
6. Add the sour cream and mix until fully combined and smooth.

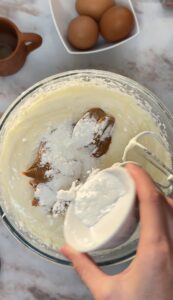
7. Pour in the cooled melted white chocolate (make sure it’s not hot, or it’ll cook the eggs later). Add the Biscoff spread, condensed milk, salt, vanilla extract, and cornstarch. Mix until smooth and beautifully combined.
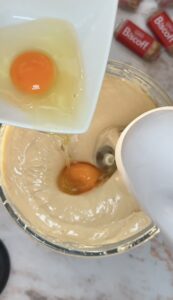
8. Add the eggs one at a time, mixing just until incorporated after each addition. Don’t overmix — too much air = cracked cheesecake!
Assemble & Bake
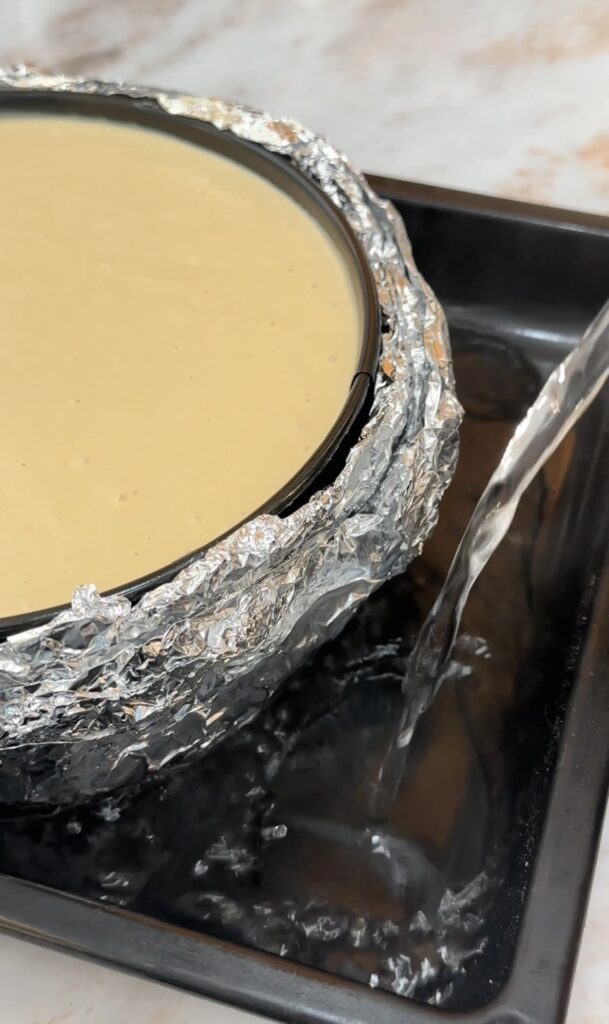
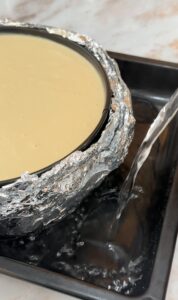
9. Wrap the outside of the springform pan with 3 or more layers of aluminum foil, sealing it tightly. This prevents water from seeping into your cheesecake during the water bath.
10. Pour the cheesecake batter over the cooled crust. Tap the pan gently on the counter to release any air bubbles, then smooth the top with a spatula.
11. Place the wrapped springform pan into a larger baking pan. Carefully pour hot water into the larger pan until it reaches about halfway up the sides of the springform pan.
12. Bake Bake at 160°C (320°F) for 1 hour. Do not open the oven during baking — it causes cracks and dips!
13. After 1 hour, turn off the oven and leave the cheesecake inside for another 1 hour with the door closed. This gradual cooling is the secret to preventing cracks. ✨
Cool & Decorate
14. Remove the cheesecake from the water bath and carefully peel off the foil. Allow it to cool completely at room temperature.
15. Cover with plastic wrap and refrigerate overnight. Patience is everything here — overnight chilling gives the cheesecake its perfect silky texture.
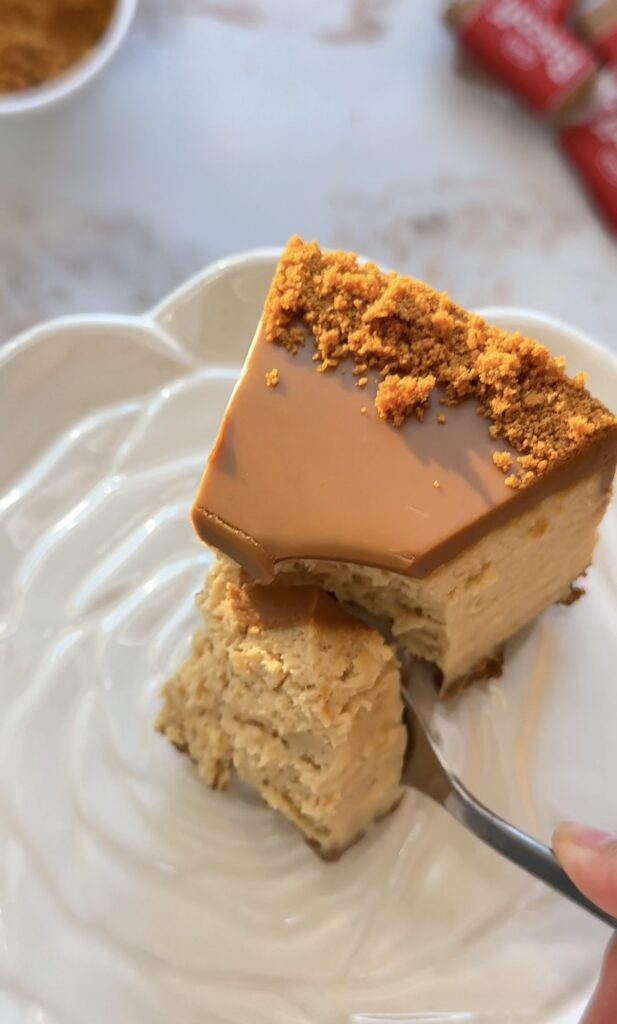
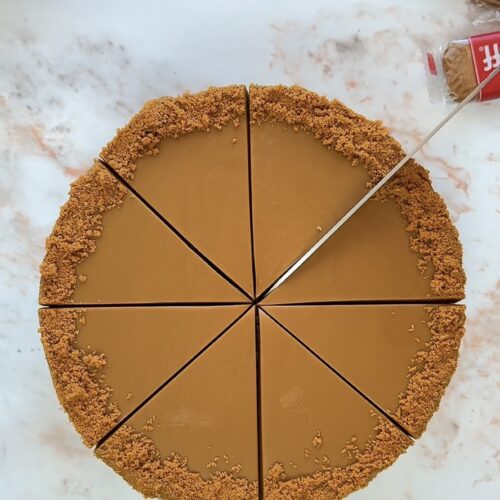
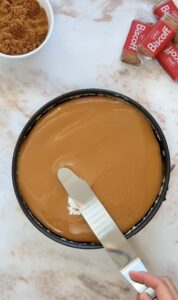
16. The next day, melt the Biscoff spread until pourable. Pour it evenly over the chilled cheesecake, then refrigerate for 15 minutes to set.

17. Garnish with crushed Biscoff biscuits for that perfect crunchy finish. When slicing, clean the knife between each cut with hot water for beautifully neat slices. ✨
👩🍳 Pro Tips from My Kitchen
- Room temperature ingredients are non-negotiable — cold cream cheese creates lumps that won’t smooth out.
- Take everything out at least 1-2 hours before starting.
- Don’t overmix the batter — once you add the eggs, mix as little as possible.
- Too much air = cracks and a sunken top.
- The water bath is essential — it creates a humid environment that bakes the cheesecake gently and evenly, preventing cracks.
- Don’t open the oven door — even a peek lets out steam and causes temperature drops that crack the surface.
- Be patient with the cooling — the gradual oven cool-down and overnight fridge time are what give cheesecake its signature silky texture.
- Use real Lotus Biscoff — for the most authentic caramelised flavor, original Lotus Biscoff spread and biscuits give the best result.
- Warm the spread gently — when melting the Biscoff topping, do it slowly in 15-second microwave bursts or over low heat to keep it smooth and glossy.
- Warm knife for clean slices — dip your knife in hot water, wipe dry, and slice. Repeat between every cut for picture-perfect slices.
Variations & Substitutions
- No-bake version: Skip the eggs and cornstarch, fold in whipped cream, and chill instead of baking
- Extra crunch: Sprinkle crushed Biscoff biscuits into the filling before baking for surprise crunchy bits
- Chocolate Biscoff: Add a layer of dark chocolate ganache before pouring on the Biscoff topping
- Mini cheesecakes: Make in a muffin tin with cupcake liners — bake for just 20-25 minutes
- Gluten-free: Use gluten-free biscuits for the crust (Biscoff itself isn’t GF)
- Biscoff swirl: Drizzle extra Biscoff spread into the batter before baking and swirl with a knife for a marbled effect
- Salted caramel twist: Drizzle salted caramel sauce on top alongside the Biscoff for an extra indulgent finish 🍯
- Whipped cream rosettes: Pipe whipped cream around the edge for a more elegant, café-style finish
What to Serve With Biscoff Cheesecake
- A cup of hot coffee or cappuccino — Biscoff and coffee are a match made in heaven ☕
- Fresh berries — raspberries or strawberries cut beautifully through the richness
- A drizzle of salted caramel for extra indulgence 🍯
- Vanilla ice cream or whipped cream for an extra-decadent serving
- Hot chocolate — for the ultimate cozy dessert moment 🍫
- A dessert wine like Moscato for a more elegant pairing 🍷
- As part of a dessert platter with chocolate truffles, brownies, or other cookie butter treats for a stunning spread
Storage & Make-Ahead
Storage: Store the cheesecake covered in the fridge for up to 5 days. The flavor and texture actually improve after a day or two!
Make-ahead: This is the perfect make-ahead dessert. Bake it 1-2 days before serving and add the topping the day you plan to serve. The overnight chill is essential anyway, so plan ahead!
Freezing: Biscoff cheesecake freezes beautifully:
- Whole cheesecake: Wrap tightly in plastic wrap and foil, then freeze for up to 2 months. Thaw overnight in the fridge before adding the topping and garnish.
- Individual slices: Wrap each slice and freeze on a tray. Thaw in the fridge for 4-6 hours before serving.
Do not refreeze once thawed.
Frequently Asked Questions
Why did my cheesecake crack? Most likely from overmixing the batter, opening the oven door during baking, or cooling it too quickly. The water bath and gradual cooling are key to preventing cracks!
Can I make this cheesecake without a water bath? You can, but the results won’t be quite as silky. If skipping, place a separate pan of hot water on the bottom rack of the oven to create steam.
What’s the difference between Biscoff spread and cookie butter? They’re essentially the same thing! “Biscoff” is the original Lotus brand, while “cookie butter” is the generic term. Trader Joe’s also has a popular version. Any of these will work in this recipe.
Can I use crunchy Biscoff spread instead of smooth? Yes — crunchy Biscoff spread adds lovely little bits of cookie throughout the filling. Just note that the topping looks smoother when you use the smooth version.
My cheesecake jiggled in the middle — is it underbaked? A slight jiggle in the center is exactly what you want! It firms up as it cools and chills overnight. If it looks completely set in the oven, it’s overbaked.
Can I make this without white chocolate? The white chocolate adds richness and helps with setting, but you can leave it out if needed. Just expect a slightly less rich texture.
How long does it need to chill? Minimum 8 hours, but overnight (12+ hours) gives the best texture and flavor.
Can I use a different size pan? Yes — for an 8-inch pan, the cheesecake will be taller and may need 10-15 extra minutes of baking. For a 10-inch pan, it’ll be flatter and cook 10 minutes faster.
Can I make this no-bake? Yes! Skip the eggs and cornstarch, fold the cream cheese mixture with whipped cream, pour over the crust, and chill for at least 6 hours instead of baking.
Biscoff Cheesecake
Ingredients
- Important: Make sure all your ingredients are at room temperature before starting. This is the #1 secret to a smooth, lump-free cheesecake!
For the Crust
- 250 g biscuits crushed — Lotus Biscoff biscuits are the dream choice here, but digestives or graham crackers also work
- 70 g unsalted butter melted
For the Cheesecake Filling
- 600 g full-fat cream cheese must be full-fat for that perfect creamy texture, low-fat will make it watery
- 100 g sugar
- 200 g full-fat sour cream
- 100 g white chocolate melted and cooled
- 200 g Biscoff spread Use Lotus Biscoff for the most authentic flavour
- 3 large eggs
- 15 g cornstarch cornflour
- ¼ tsp salt
- 1 tsp vanilla extract
- 5 tbsp condensed milk
For the Topping
- 200 g Biscoff spread melted until pourable — for that glossy, dreamy finish
- Crushed Biscoff biscuits
Instructions
Make the Crust
- Preheat your oven to 180°C (350°F). Grease a 9-inch round springform pan with butter, then flip the base of the pan upside down — this little trick makes releasing the cheesecake so much easier later! Line the bottom with baking paper.
- Finely crush the biscuits in a food processor (or place them in a sealed bag and crush with a rolling pin). Transfer to a bowl and add the melted butter, mixing until evenly moistened — it should look like wet sand.
- Transfer the mixture into the prepared pan. Spread it into an even layer and press it down firmly using the base of a cup — this gives you a perfectly even, compact crust. Bake for 10 minutes, then remove from the oven and let cool completely.
Make the Cheesecake Filling
- Add the room-temperature cream cheese to a large mixing bowl and beat for 3 minutes until completely smooth and creamy. This step is essential — don’t rush it!
- Add the sugar and beat for another 2 minutes until fully combined and fluffy.
- Add the sour cream and mix until fully combined and smooth.
- Pour in the cooled melted white chocolate (make sure it’s not hot, or it’ll cook the eggs later). Add the Biscoff spread, condensed milk, salt, vanilla extract, and cornstarch. Mix until smooth and beautifully combined.
- Add the eggs one at a time, mixing just until incorporated after each addition. Don’t overmix — too much air = cracked cheesecake!
Assemble & Bake
- Wrap the outside of the springform pan with 3 or more layers of aluminum foil, sealing it tightly. This prevents water from seeping into your cheesecake during the water bath.

- Pour the cheesecake batter over the cooled crust. Tap the pan gently on the counter to release any air bubbles, then smooth the top with a spatula.

- Place the wrapped springform pan into a larger baking pan. Carefully pour hot water into the larger pan until it reaches about halfway up the sides of the springform pan.
- Bake at 160°C (320°F) for 1 hour. Do not open the oven during baking — it causes cracks and dips!
- After 1 hour, turn off the oven and leave the cheesecake inside for another 1 hour with the door closed. This gradual cooling is the secret to preventing cracks. ✨
Cool & Decorate
- Remove the cheesecake from the water bath and carefully peel off the foil. Allow it to cool completely at room temperature.
- Cover with plastic wrap and refrigerate overnight. Patience is everything here — overnight chilling gives the cheesecake its perfect silky texture.
- The next day, melt the Biscoff spread until pourable. Pour it evenly over the chilled cheesecake, then refrigerate for 15 minutes to set.
- Garnish with crushed Biscoff biscuits for that perfect crunchy finish. When slicing, clean the knife between each cut with hot water for beautifully neat slices. 🍪✨

- Video Tutorial